Sunday 30 November 2014

Our New GD Anna Sigga and her beautiful card

Hello!
Another week, another talented Guest Designer. This time we would like to introduce you to Anna Sigga. Let's start with Anna's short bio.

Witajcie!
Kolejny tydzień, kolejna utalentowana Gościnna Projektantka. Tym razem chcielibyśmy Wam przedstawić Annę Siggę. Zacznijmy od jej krótkiej biografii. 

***

My name is Anna Sigga and I am 30 something young scrapbooker from Iceland! I live in Reykjavik, Iceland along with my handsome man and our two girls.
I have been into all kinds of paper-crafting for as long as I can remember but I only discovered scrapbooking in January 2005 - and I must admit that my scrapbooking addiction grows every year.
When it comes to describing my style I guess you could say that I like soft colors, misting, flowers and I usually add a touch of ink whenever possible. I recently discovered the joys of mixed media within scrapbooking and I love creating a layout with a bit of messy-ness thrown in to the mix.
I am so thrilled to be a part of the Guest design team here at 13 Arts and look forward to get messy with all those yummy products! Thanks so much for this opportunity! :)

***
 
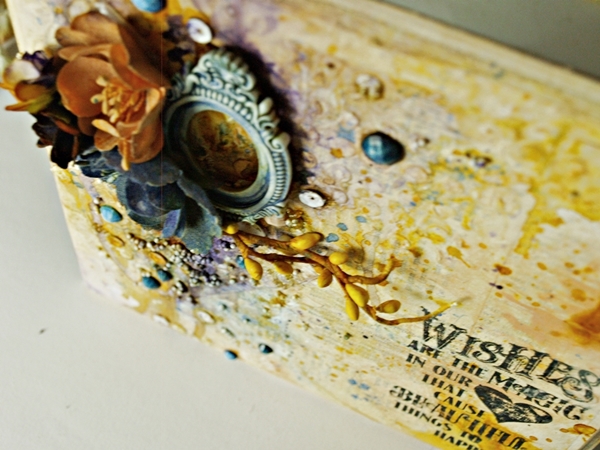
The mists and Magenta paint are so vibrant that I just had to create a mixed media card using these bright colors.
I used a rather thick watercolor paper as my base and covered the paper with Gesso and then I added the mists and paint to the mix.
The large flower is absolutely gorgeous and take the mist perfectly, the pink twigs and the holographic glitter were just the perfect addition to this card.
I hope you like this lil project of mine and thank you so much for visiting!


***
Thank you Anna for this beautiful card!
Dziękujemy Anno, za tę piękną kartkę!

Saturday 29 November 2014

A Notebook by Natalya Loi

Hi everyone!
Natalya Loi is here. Today I want to show you a notebook which I made as a gift for a birthday party for  my friend. She is a very bright and creative girl. She loves black like me.
For creating notebook I used my favorite 13arts' materials  - masks, sprays and stunning fabric flowers!


Some details:


Notes is fastened onto a tape which was originally white. I painted it with metallic and chalk mists


On the flyleaf there is an amazing paper from the "Сozy evening" collection


Black background with shiny accents. I love this combination!


These fabric flowers from 13arts are just incredible! Stunning colors and lightness!


♥♥♥


Thank you for your attention! 
Natalya Loi with ♥


Friday 28 November 2014

Mini Art Kits- a tutorial by Olga Heldwein

Hey Guys Olga here !

Have You seen new Mini Art Kits in 13 arts store? They're a perfect solution for those who want to start an adventure with mixed media or just want to try some products. Kit includes all basic products like gesso, gel medium and texture paste in mini jars and mini misters with some 13 arts colors and splash! ink. There is also a palette knife and a spare mister. Whole bunch of nice products in nice price !
Cześć tu Olga !
Czy widzieliście już nowe Mini zestawy mediowe w sklepie? To idealne rozwiązanie dla tych którzy dopiero zaczynają mediową przygodę lub chcą sobie tylko protestować produkty. Każdy kit zawiera wszystkie podstawowe produkty: gel medium, gesso, pastę strukturalną oraz 3 mini mgiełki i tusz splash! Znajdziecie w nim także szpatułkę oraz dodatkowy atomizer :)


Today I have a simple project with a video tutorial from creating process and nice color combo for you :)
A dzis mam dla was prace z filmikiem z procesu kreatywnego zapraszam do oglądania


I used some micro glass beads, sequins and some self adhesive rhinestones to create some texture for my colors
Żeby nadać dość płaskiej jak na mnie pracy trochę tekstury użyłam mikrokulek cekinów i kryształków.
Some more details. Więcej szczegółów


Products which were used / Użyte produkty:
Mgiełka pastelowa - Pastel Caramel


Thursday 27 November 2014

Winners for Challenge #24

Our last challenge "The best part of me" hosted by Irina Honcharyk has now ended, and it's time to announce the results. Thank You for all your beautiful projects, you are all sooooo talented - you all keep blowing our minds time after time! It was very difficult to choose 3 best projects again, but our DT has voted and decided, that the November super talented winner is:

Nasze wyzwanie: "Najlepsze we Mnie" autorstwa Iriny Honcharyk dobiegło końca i czas ogłosić wyniki. Dziękujemy Wam za wszystkie piękne prace. Wszyscy uczestnicy pokazali nam swój prawdziwy talent i jak zwykle byliśmy pod ogromnym wrażeniem Waszych prac. Nie było łatwo wybrać tylko 3 projekty, ale nasz Design Team zdecydował, że naszymi utalentowanymi zwycięzcami zostają:


Congrats Tiphanie! We really adore your layout and hope to see you here again.
You will receive a voucher for shopping in 13@rts store worth 60 PLN with free international postage. We would also like to invite you for guest designing in one of our next challenges. Please send us an e-mail at: 13arts@wp.pl in seven days after the challenge results to claim your prize.
Also, please take your badge and wear it proudly.

Gratulacje Tiphanie! Bardzo spodobała nam się Twoja praca i mamy nadzieję, że jeszcze nie raz będziesz się z nami bawić. Otrzymujesz bon na zakupy w sklepie 13arts wart 60zł (z darmową międzynarodową wysyłką). Zapraszamy Cię również na gościnny występ w jednym z naszych przyszłych wyzwań. Proszę, napisz do nas na adres: 13arts@wp.pl w ciągu 7 dni od ogłoszenia wyników by odebrać swoją nagrodę. Przyjmij też nasz banerek i noś z dumą ;)

As said, there were so many beautiful projects, and here are the rest of the TOP3. Ladies, please take your badge below.
Jak wspomnieliśmy wcześniej, otrzymaliśmy od Was mnóstwo pięknych projektów i oto pozostałe osoby, które znalazły się w naszym TOP3. Dla Was banerki poniżej. 

Second place: Aszczka
Drugie miejsce

Third place: Janka
Trzecie miejsce:


Once again Thank You so much for playing with us! We'd like to invite you to join our new challenge soon - it will be something very warm and cosy!
Jeszcze raz dziękujemy, że bawiliście się z nami! Zapraszamy Was na nasze kolejne wyzwanie, które ogłosimy już wkrótce- będzie coś ciepłego i przytulnego!

Best regards,
13@rts DT
Pozdrawiamy,
Zespół 13arts!

Dream..... Layout and Tutorial by Jacqueline Moore

Hello everyone!!! It's Jacqueline here today to share with you a layout I created using the gorgeous new Color Basics line, along with many beautiful mediums, mists and paints!!! I just love 13 Arts products, the papers are very strong and will take lots of media, and you can create fantastic effects withe their mists, paints, ect. I have put together a tutorial for you today, so please read through!!!

'Dream'


Some close-ups:


And here is a tutorial for you!!!


Steps 1 and 2: Scrape 13 Arts Gesso randomly over a sheet of paper from the color basics collection using a palette knife. Then using the square stencil from the color basics collection spray Ayeeda Mist: Pearl Turquoise Light through the stencil, in or near gessoed area, moving it around the page, and turning over occasionally to stamp excess mist onto background.


Steps 3 and 4: When the mist is dry, scrape some more gesso over the top. This will stop the sprayed and stamped color mixing when we spray it later. Don't worry if some of the color lifts into the gesso creating a slightly blue paste. This adds to the effect later!!! Then once again using your square stencil spread modelling paste around your background. You can let it dry naturally or with a heat gun. 
I choose to let mine dry naturally, which meant these next couple of steps were completed and photographed at night, so I do apologize for the poor photos.


Step 5: This is my favorite part!! Spray a couple of colors of mist. I have used Pastel Turquoise, and Pastel Cobalt, along with a touch more of the Pearl Turquoise light. You don't need to cover your area.... Just a few sprays, then we blend and move the colors around with a brush. Occasionally flick the excess off your brush over the page to create some splats. I have also added a few green splatters.
When your background is around half way dry, use a very wet brush to splatter lots of water all over your background.... This creates those awesome watercolor effects!!


Steps 6 and 7: When everything was dry I decided to highlight the inside of a few squares around the page with a white gel pen. I also used the Pearl Navy Blue Mist and a small paintbrush to create some darker shadows around some of the squares.


Steps 8 and 9: I finished my background by doodling in some black pen randomly around the outside of some squares, and stamping some butterflies on my background.


Steps 10 and 11: Next I start to build my composition. Each layer of paper is separated by a row of foam tape for dimension, and I have distressed all the edges. Before I put my photo down I flicked some more mists on my papers, in particular on each side. I also added there, some microspheres in 2 sizes, glued down with gel Medium, and sprayed when dry. As you can see in the second photo the papers now blend into the background.
I add a few different types of twine, threads and my photo, then begin to add my embellishments.


Steps 12 and 13: I continue to build up my embellishments, layering flowers, and adding some chipboard from the color basics collection. The heart frame at the bottom has also been covered with microspheres and sprayed, while the heart and dream word have been painted white with gesso and outlined in gold gel pen.
I finished off my page by lightly dry brushing all my embellishments with gesso, and then painting with Ayeeda Paint in gold glitter, adding some beautiful sparkle. I then sprayed everything with Pearl Mist in Silver for extra shimmer.

 I hope you found something in this post to inspire you!
Wishing you all a wonderful upcoming weekend!!


Products used:
Ayeeda Gesso
Ayeeda Modelling Paste
Ayeeda Gel Medium
Glass Microspheres
Glass Microspheres D2
Ayeeda Mist - Pearl Navy Blue
Ayeeda mist - Pearl Turquoise Light
Ayeeda Mist - Pearl Silver
Ayeeda Mist - Pastel Turquoise 
Ayeeda Mist - Pastel Cobalt
Ayeeda Mist - Pastel Green
Ayeeda Mist - Pastel Blue
Ayeeda Mist - Chalk White
Ayeeda Paint - Gold Glitter
Paper - Color Basics - Pastel Mint/Pastel Turquoise
Paper - Color Basics - Grey Indigo/Blue Light
Paper - Color Basics - ADD-ON Basic Faded Paper Color Blue
Color Basics Mask - Squares 
Chipboard - Color Basic-Words
 Paper Flowers - Cherry Blossoms - White
Paper Flowers - Roses 4pcs - White


Wednesday 26 November 2014

Good Vibes - layout by Anna Rogalska

Hi everyone! I am here today to share with you a new project I made using some 13arts mediums. In my layout I have used newest collection Color Basic - papers and chipboards. 

Witam wszystkich! 
Chciałabym dzisiaj podzielić się z Wami nowym projektem, który powstał z użyciem mediów od 13arts. Do zrobienia mojego layoutu użyłam najnowszą kolekcję Color Basic - papiery i tekturki.


Some close-ups 

Kilka zbliżeń 


13@rts products used:
 

Thanks for visiting! Have a nice day!    
 
Dziękuję za odwiedziny! Miłego dnia! 
 
Anna Rogalska